")
")
")
Cisco Firepower’s “Decrypt Known Key” SSL Decryption allows the inspection of encrypted traffic directed to internal servers. By using the private key of the server, which is uploaded to the Cisco Firepower Threat Defense (FTD), the system decrypts incoming SSL/TLS connections for detailed security analysis. This method ensures that encrypted transmissions can be monitored for threats while maintaining encryption standards for outbound traffic. It is particularly useful for environments where internal resources are accessed externally.
What is Cisco Firepower SSL Decryption Policy?
In the last section, we talked about Cisco Firepower decryption policy and its applications. But just to implement the second application, it’s not bad to review the concept.
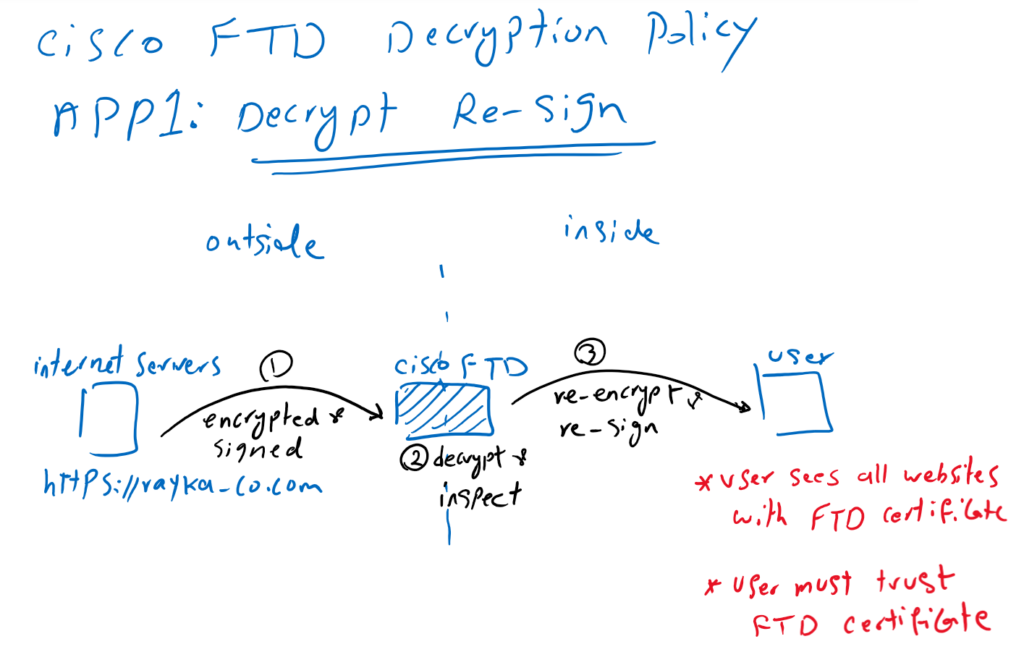
Application1: Decrypt Re-Sign
In Cisco Firepower SSL decryption, the two main policies are:
- Decrypt Re-Sign: This policy involves decrypting outbound SSL/TLS traffic, inspecting it for security threats, and then re-encrypting it with a certificate that the firewall itself signs. It’s typically used to monitor traffic from internal users accessing external services.
- Decrypt Known Key: This is used for inbound SSL/TLS traffic to internal servers, where the server’s private key is known and uploaded to the firewall. This allows the firewall to decrypt traffic directed to these servers for inspection before it is processed by the server.
In the “Decrypt Re-Sign” method used by Cisco Firepower, when an internal user accesses an HTTPS website outside the network, Firepower decrypts the traffic to inspect it. Post-inspection, the content is re-encrypted and re-signed using Firepower’s certificate before being sent back to the user. Consequently, all external websites appear as trusted by the Firepower certificate from the user’s perspective. This approach necessitates that all internal users trust the Firepower certificate for seamless operation.
Application2: Decrypt Known Key
In the “Decrypt Known Key” method used by Cisco Firepower, the focus is on securely managing inbound traffic to SSL applications owned within the network. Here, Cisco Firepower decrypts and inspects the incoming traffic using the server’s certificate and private key, which it possesses. This is crucial to prevent any malicious content from external users from reaching the internal servers. By having the private key, Firepower ensures that all incoming content is thoroughly vetted before it reaches the server, enhancing the security of internal applications.
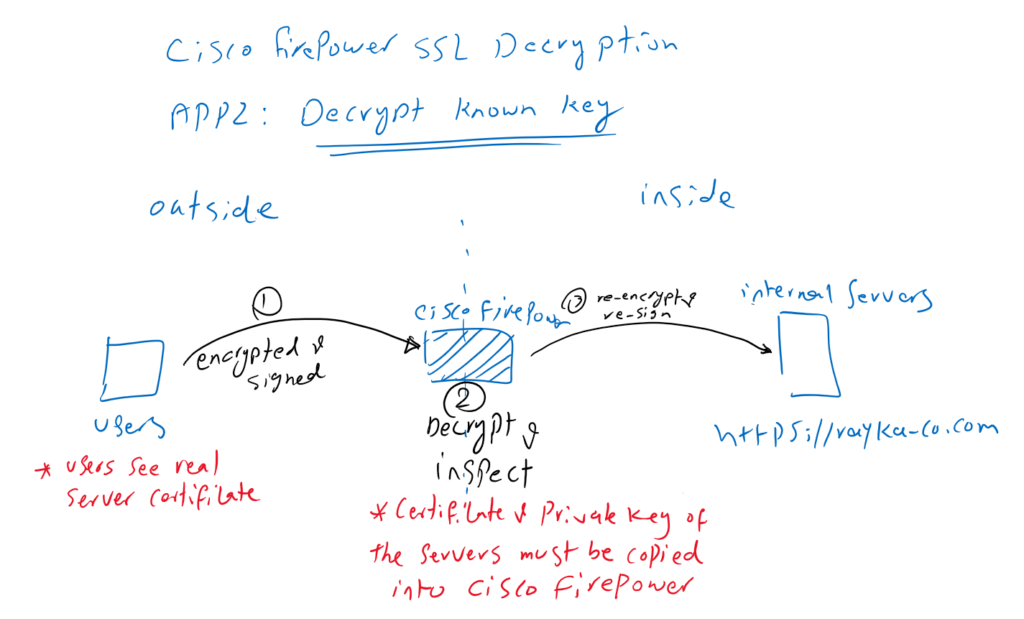
Here’s an example illustrating the “Decrypt Known Key” method:
Scenario: A healthcare organization offers an online patient portal where external users (patients) can access their personal health records. The portal is hosted on the organization’s internal server.
- Certificate Upload: The healthcare organization’s IT team uploads their server’s SSL certificate and private key to the Cisco Firepower system.
- Traffic Decryption: When patients access their health records, their HTTPS traffic is encrypted. Cisco Firepower uses the uploaded private key to decrypt this incoming traffic.
- Content Inspection: Once decrypted, Cisco Firepower inspects the traffic for potential threats, such as malware or unauthorized data access attempts, ensuring the integrity and confidentiality of sensitive health information.
- Traffic Re-encryption: After inspection, the traffic is re-encrypted and sent to the internal server, which then processes the requests securely.
This process helps safeguard sensitive patient data while allowing the healthcare provider to monitor and mitigate any potential cybersecurity threats.
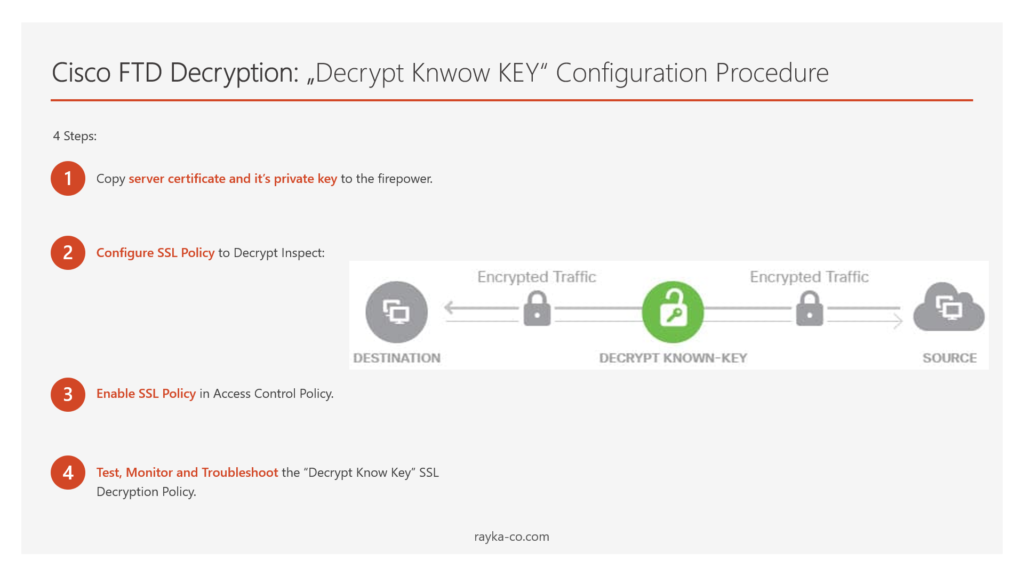
Cisco Firepower SSL Decryption: Decrypt Know Key Configuration
The procedure for configuring Cisco Firepower SSL Decryption using the “Decrypt Known Key” method:
- Upload Server Certificate and Private Key:
- Import the server’s SSL certificate and its private key into Cisco Firepower. This enables Firepower to decrypt the encrypted traffic that is intended for your server.
- Configure SSL Decryption Policy:
- Set up an SSL policy within Firepower to specify which traffic should be decrypted and inspected. Define criteria based on your security requirements and traffic patterns.
- Activate SSL Policy in Access Control:
- Integrate the SSL decryption policy into your existing access control policies. This activation is crucial as the decryption operations will not function until they are recognized within the broader security framework of your network.
- Testing and Monitoring:
- After configuration, test the setup by initiating secure HTTPS connections from outside the network to your server. Monitor the effectiveness of the decryption and inspection processes and troubleshoot any issues that arise, ensuring the system is functioning as intended.
Copy Server Certificate and it’s Private Key to the Firepower
Before transferring the server’s certificate and private key to Cisco Firepower for SSL decryption, I’ll walk you through how I prepared these credentials using OpenSSL. I used the OpenSSL software to create a certificate and private key, which are essential for setting up an HTTPS server. These same credentials are then uploaded to Firepower, allowing it to decrypt and inspect encrypted traffic directed to the server.
For your reference, I downloaded the Windows version of OpenSSL from their official site, specifically version 1.1.1m.
https://slproweb.com/products/Win32OpenSSL.html
– i create a 2048-bit RSA public/private key pair with the following command:
C:Program FilesOpenSSL-Win64bin>openssl genrsa -out rayka-co.local.key 2048
Generating RSA private key, 2048 bit long modulus (2 primes)
.......................+++++
...........................................................+++++
e is 65537 (0x010001)
I use the name “rayka-co.local.key” for my RSA key pair.
– We generate a certificate signing request (CSR) with the help of RSA key pair with the following command:
C:Program FilesOpenSSL-Win64bin>openssl req -new -sha256 -key rayka-co.local.key -out rayka-co.local.csr
You are about to be asked to enter information that will be incorporated
into your certificate request.
What you are about to enter is what is called a Distinguished Name or a DN.
There are quite a few fields but you can leave some blank
For some fields there will be a default value,
If you enter '.', the field will be left blank.
-----
Country Name (2 letter code) [AU]:IR
State or Province Name (full name) [Some-State]:TEHRAN
Locality Name (eg, city) []:TEHRAN
Organization Name (eg, company) [Internet Widgits Pty Ltd]:RAYKA
Organizational Unit Name (eg, section) []:SECURITY
Common Name (e.g. server FQDN or YOUR name) []:www.rayka-co.local
Email Address []:[email protected]

Please enter the following 'extra' attributes
to be sent with your certificate request
A challenge password []:
An optional company name []:
You will be asked to give the information regarding the certificate. then a CSR file (certificate request) will be generated with the name of “rayka-co.local.csr”.
To make sure of the validity of the CSR, we run this command:
C:Program FilesOpenSSL-Win64bin>openssl req -text -in rayka-co.local.csr -noout
Certificate Request:
    Data:
        Version: 1 (0x0)
        Subject: C = IR, ST = TEHRAN, L = TEHRAN, O = RAYKA, OU = SECURITY, CN = www.rayka-co.local, emailAddress = [email protected]
        Subject Public Key Info:
            Public Key Algorithm: rsaEncryption
                RSA Public-Key: (2048 bit)
                Modulus:
                    00:e0:a6:ea:40:20:70:d8:9d:98:e3:4e:34:65:b5:
                    6f:fe:e9:b8:71:a4:79:c0:52:2d:15:9c:95:69:4a:
                    9f:30:ab:69:da:0e:89:00:f6:ab:9e:e7:30:a1:e4:
                    05:5c:b6:7b:ea:43:78:9a:ad:82:de:df:39:f2:6c:
                    a8:d2:4d:bd:58:47:64:2d:fd:91:df:42:2a:f8:7a:
                    6f:20:dd:7b:5d:91:ea:d6:1c:37:8b:fc:03:39:cc:
                    be:5e:e7:1d:55:17:80:7c:5e:86:03:a9:25:50:7b:
                    c0:b4:8a:ed:fe:74:5f:d2:4c:18:70:16:6b:d5:d8:
                    7a:75:61:66:c6:b2:60:4a:55:2c:5d:f5:b3:11:5d:
                    21:22:a2:d5:d7:c5:49:03:de:c6:f0:43:58:0c:1c:
                    16:17:b8:44:a7:f6:ad:98:df:f5:c5:e2:30:01:e4:
                    a1:e0:e8:b8:ab:7a:ba:9f:b2:dd:99:c2:b6:40:49:
                    aa:1b:53:5a:f3:70:5b:29:0d:21:11:28:2e:91:97:
                    8a:28:66:b0:a4:cd:25:a2:41:fd:1f:4c:d7:d0:d2:
                    aa:5c:c6:3b:e8:6f:80:f5:e5:bd:8e:67:9d:34:cd:
                    77:10:8f:50:49:fa:d2:75:96:35:db:67:fa:9b:d0:
                    21:ef:aa:e0:83:5f:1c:b8:18:d2:a7:77:f9:9a:4a:
                    4b:f3
                Exponent: 65537 (0x10001)
        Attributes:
            a0:00
    Signature Algorithm: sha256WithRSAEncryption
         48:94:3f:f0:5a:24:fe:9b:89:49:ad:d5:f9:fa:2f:fc:d9:8d:
         5f:59:f7:51:cc:b8:de:ea:aa:69:91:cc:7f:7e:6d:7a:74:44:
         c9:29:37:a3:5e:96:1b:fd:d8:6c:57:2e:ff:9c:d1:ce:d1:c0:
         3e:b0:e9:2a:da:7a:62:a4:23:57:fd:66:10:83:8b:f5:2e:4f:
         fe:b6:78:bf:0d:37:63:b6:b2:7d:45:4a:5e:3a:ac:7d:55:da:
         77:d3:74:e0:c0:51:f9:9d:c5:3d:81:db:3a:70:6a:3a:c2:bd:
         7b:0e:b9:45:6d:b5:18:e4:30:da:76:a3:8d:df:b3:05:cc:2b:
         12:52:65:71:93:f9:3b:cb:3f:ed:42:60:6b:ff:e5:37:90:84:
         9b:03:bc:b0:4f:2a:15:0b:03:1d:cf:f7:f7:a1:ab:6d:81:4d:
         e3:b0:bf:4f:89:e5:27:53:ae:04:cb:f7:6c:e5:17:31:17:41:
         d2:0a:e3:f7:fb:eb:b8:a4:14:dd:db:8f:ed:8d:ee:6e:4c:c1:
         8d:36:fd:82:8f:2f:98:cc:21:f7:3d:d8:2e:98:37:1c:c4:23:
         4d:98:2e:14:45:19:c7:59:2d:c6:45:e7:65:44:a9:d9:d4:49:
         31:d5:70:94:76:f2:7d:24:f6:f1:b6:b1:d1:64:dd:39:9d:99:
         b9:10:07:6b

C:Program FilesOpenSSL-Win64bin>
– We give the CSR to the Certificate Authority (CA) to receive a certificate
Generated CSR will be forwarded to Microsoft CA to receive the final certificate. we use “Web Server” as the template since this certificate will be used for a web server.
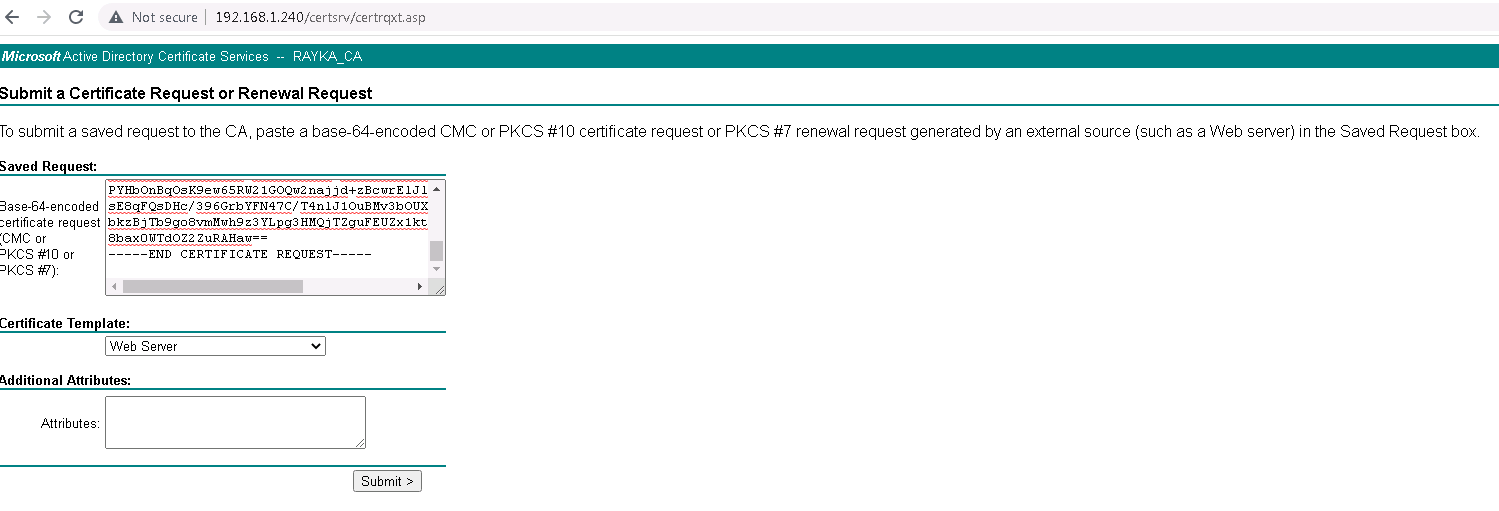
If you do not know how to install and configure Microsoft CA, I have already explained it in a lesson named “3. SD-WAN Certificate Authority Configuration” in SD-WAN course.
– Copy the certificate and private key both in server and firepower
I do not want to show you how I have used certificate and private key to bring up a sample https website with the address https://www.rayka-co.local. Since there are many methods and software that can be used like IIS, Apache and Nginx.
But I show you how I have copied the certificate and private key in cisco firepower.
Objects -> Object Management -> PKI -> internal Certs -> Add Internal Cert
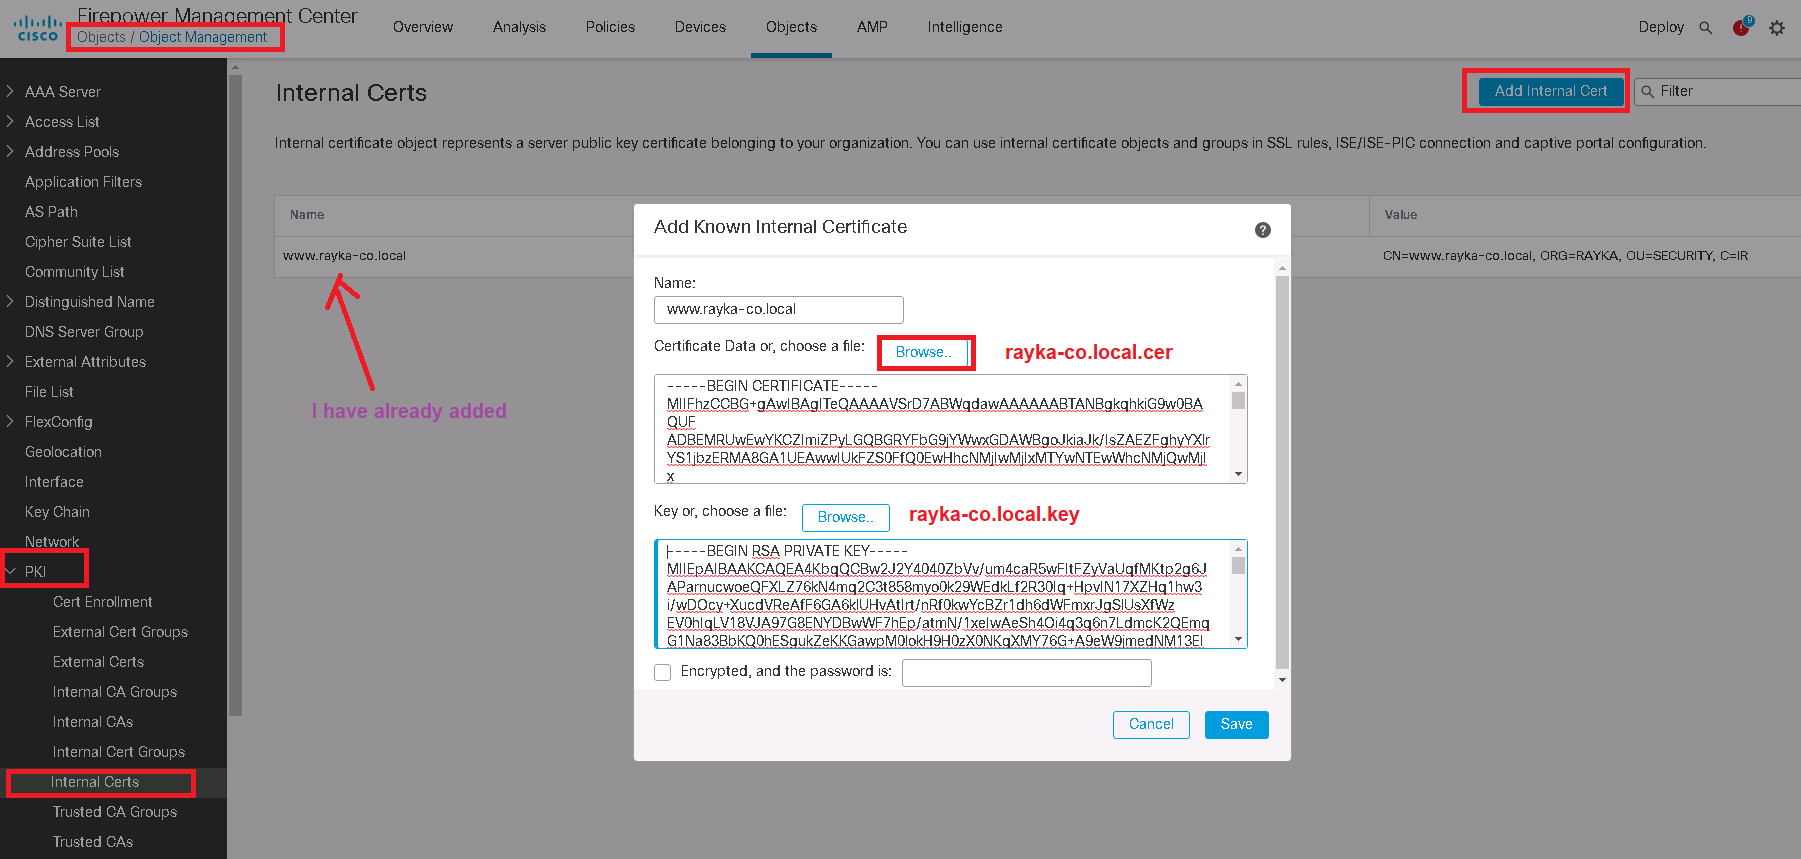
Notice that enterprise certificate CA must be trusted by firepower since it has signed already server certificate.
To do this, we download the CA certificate from Microsoft CA and add it to the “Trusted Certificate Authority” in Cisco firepower.
http://192.168.1.240/certsrv/ -> Download a CA certificate, certificate chain, or CRL -> Download CA certificate
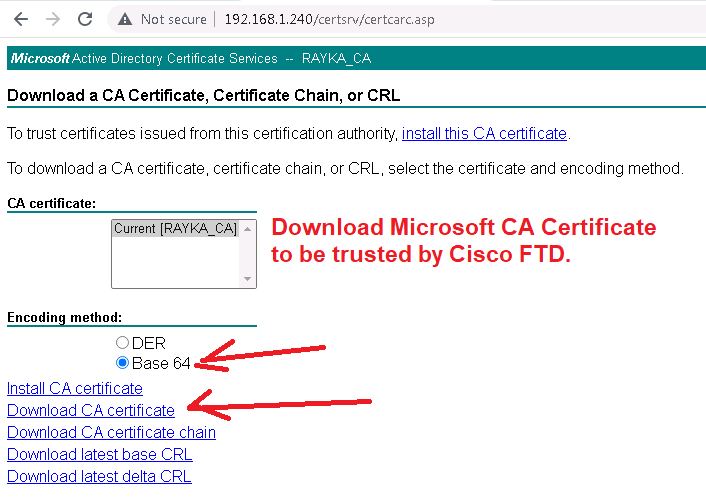

It is also worth mentioning that the CA and server certificate must be trusted by all users outside the network. Otherwise they will get a certificate error message when browsing our web server.
Configure SSL Policy to Decrypt and Inspect with “Decrypt Know Key”
In the next step, we have to add a SSL Policy.
in our example we will decrypt the access to our web server with address https://www.rayka-co.local.
To add a new SSL policy, first do not forget to trust enterprise CA certificate in your SSL Policy.
Policies -> SSL -> New Policy -> Trusted CA Certificates
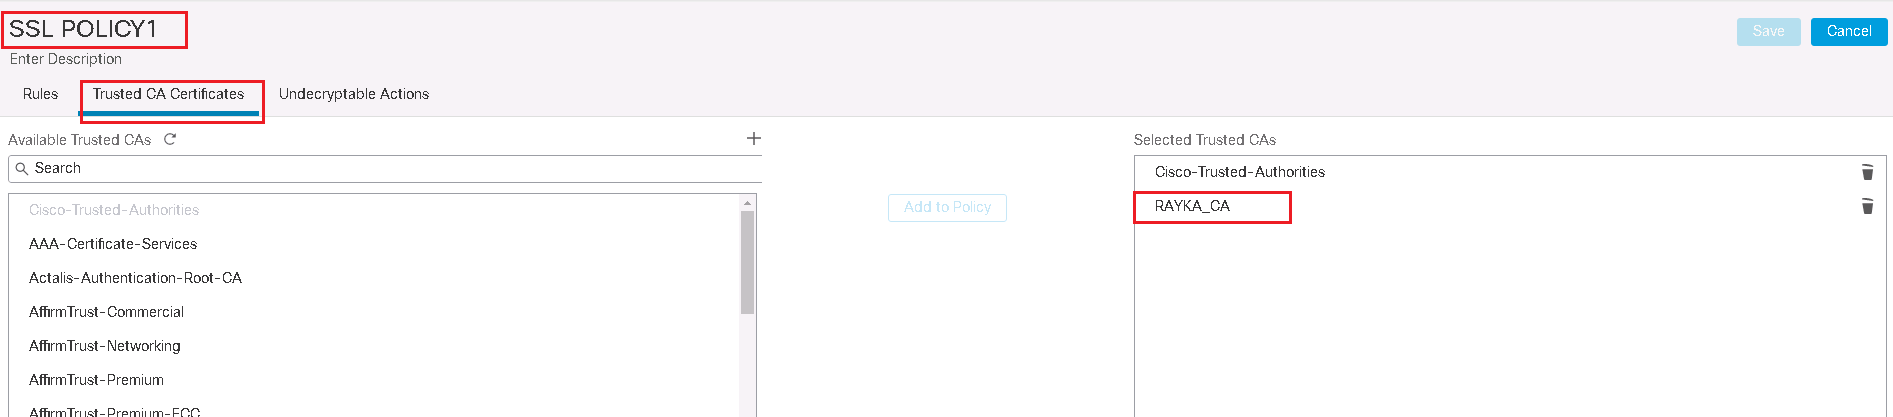
Then we add SSL rules.
The rule is to decrypt all SSL traffic using the “Decrypt Know Key” action. We choose the server certificate and private key as the key to be used to decrypt the traffic destined to our web server.
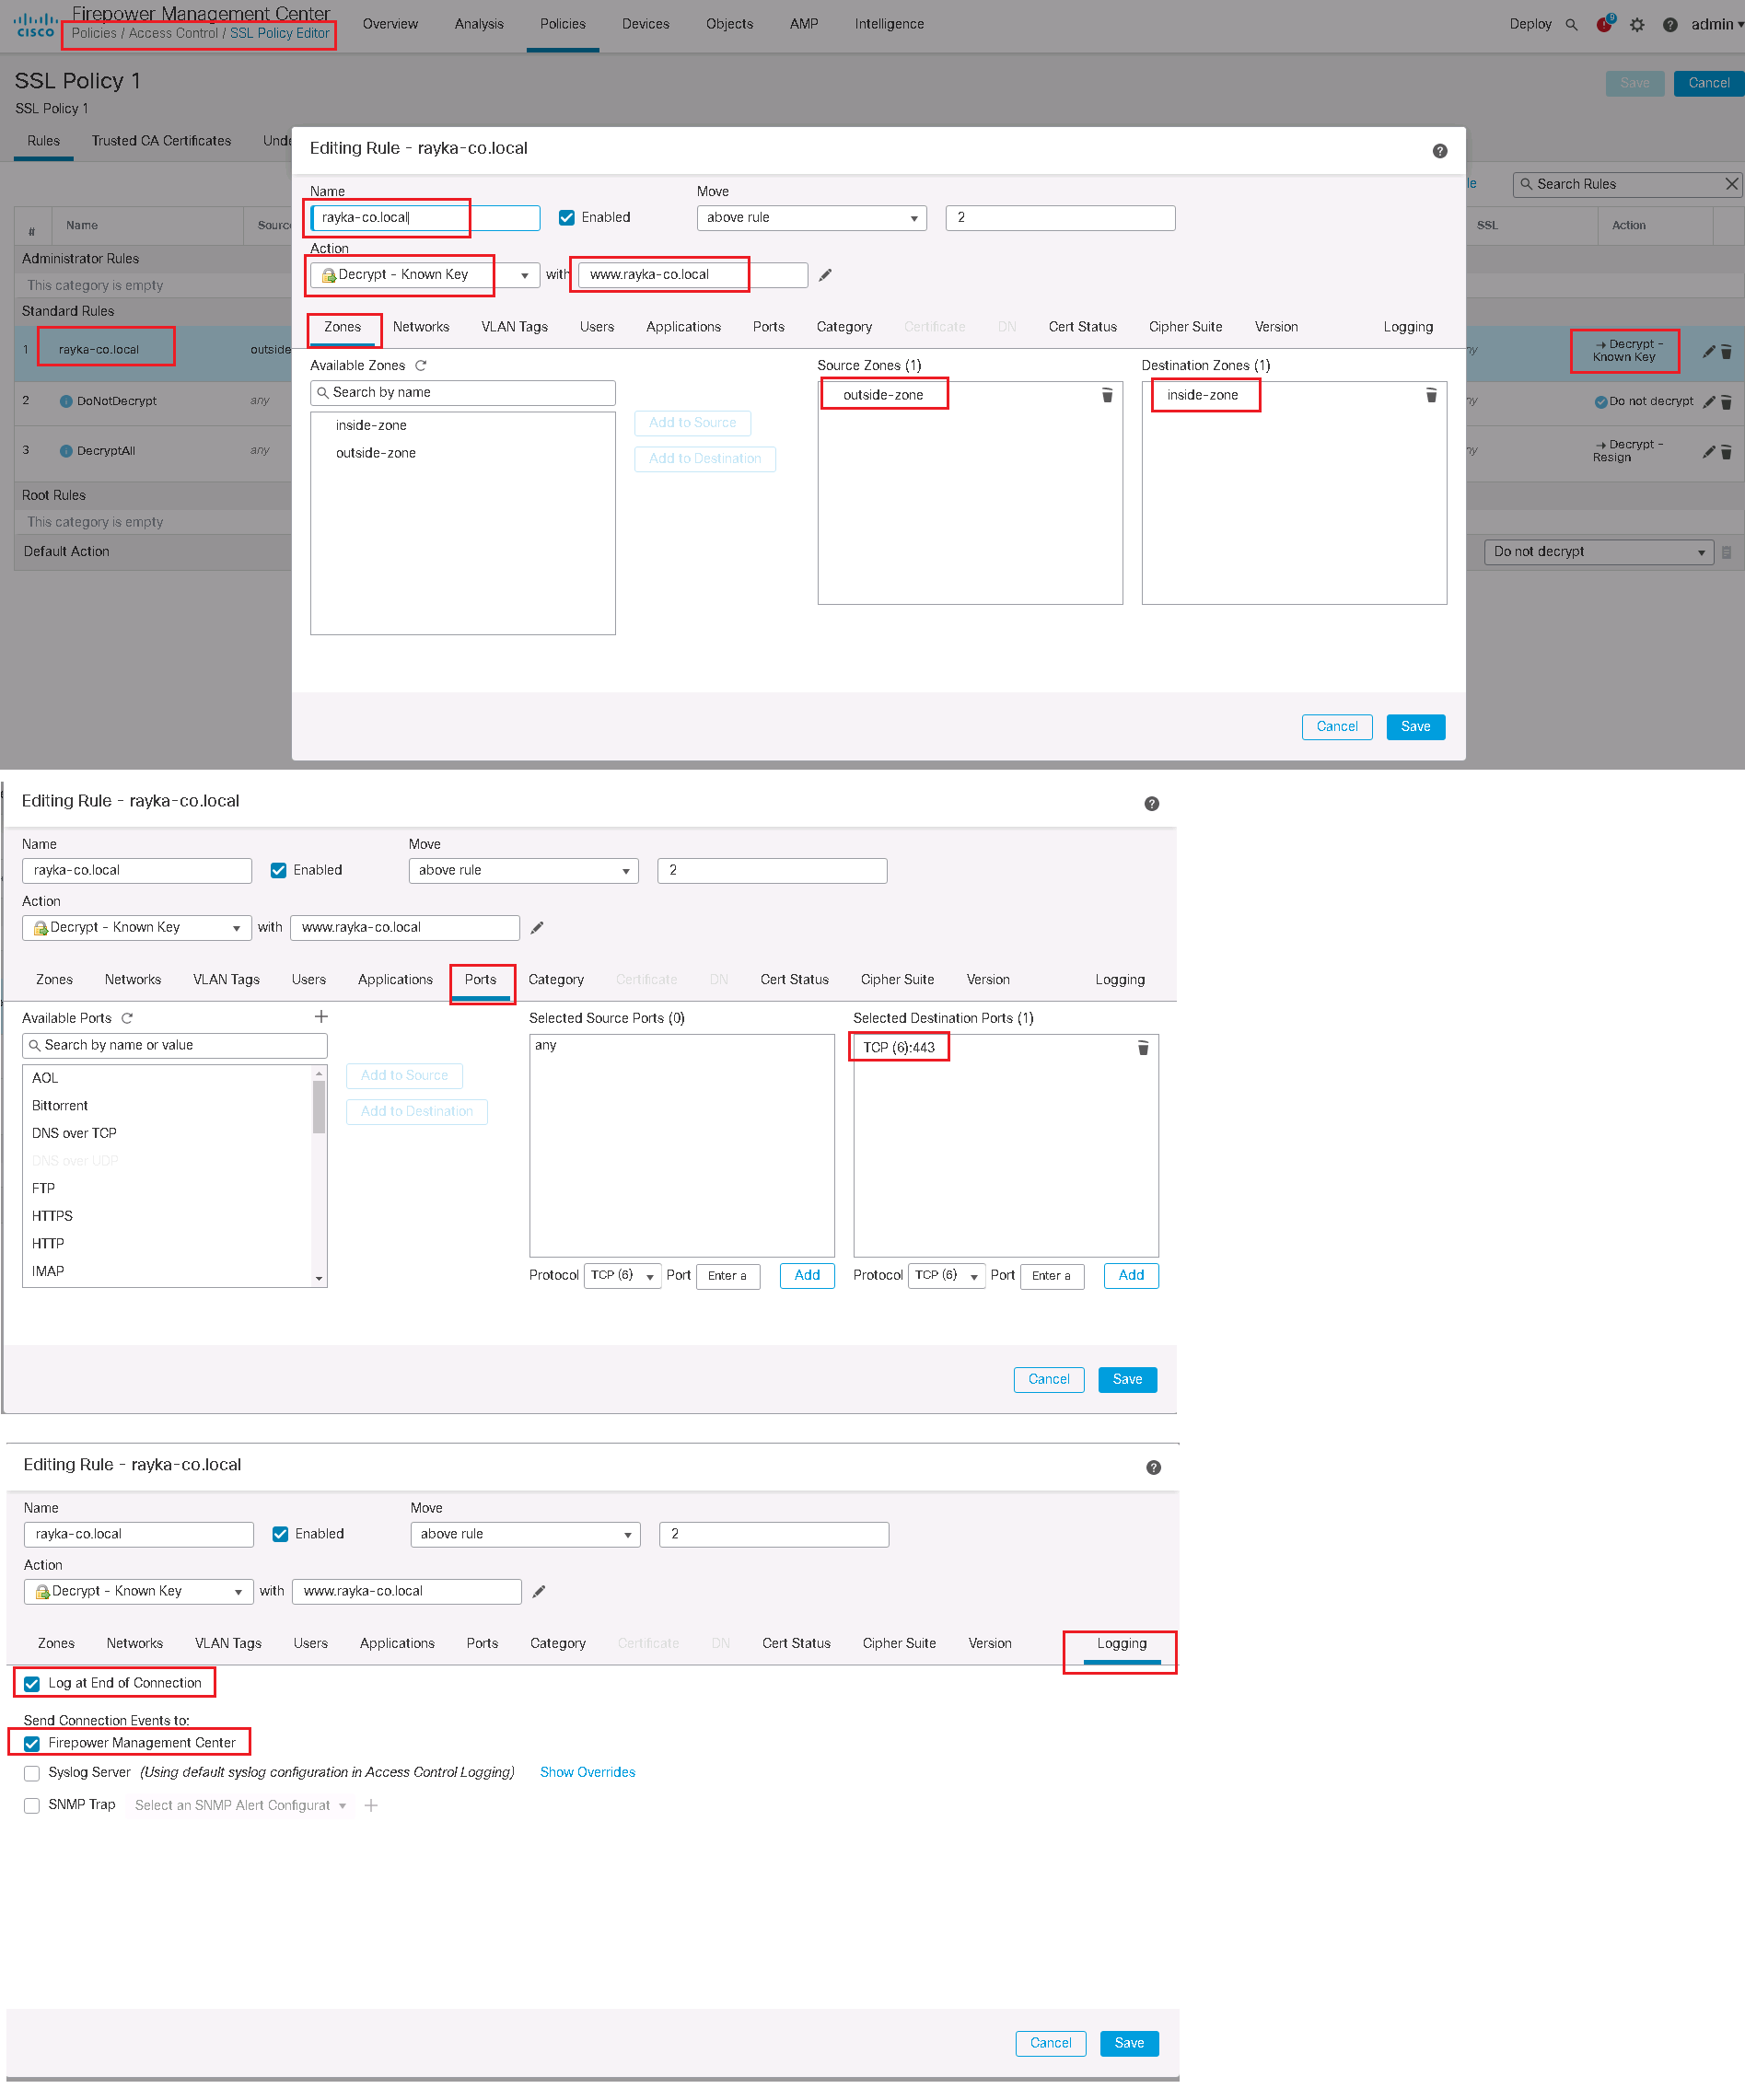
Enable SSL Policy in Access Control Policy
SSL Policy will not work until it is activated in Access Control Policy.

Test, Monitor and Troubleshoot the “Decrypt Know Key” SSL Decryption Policy
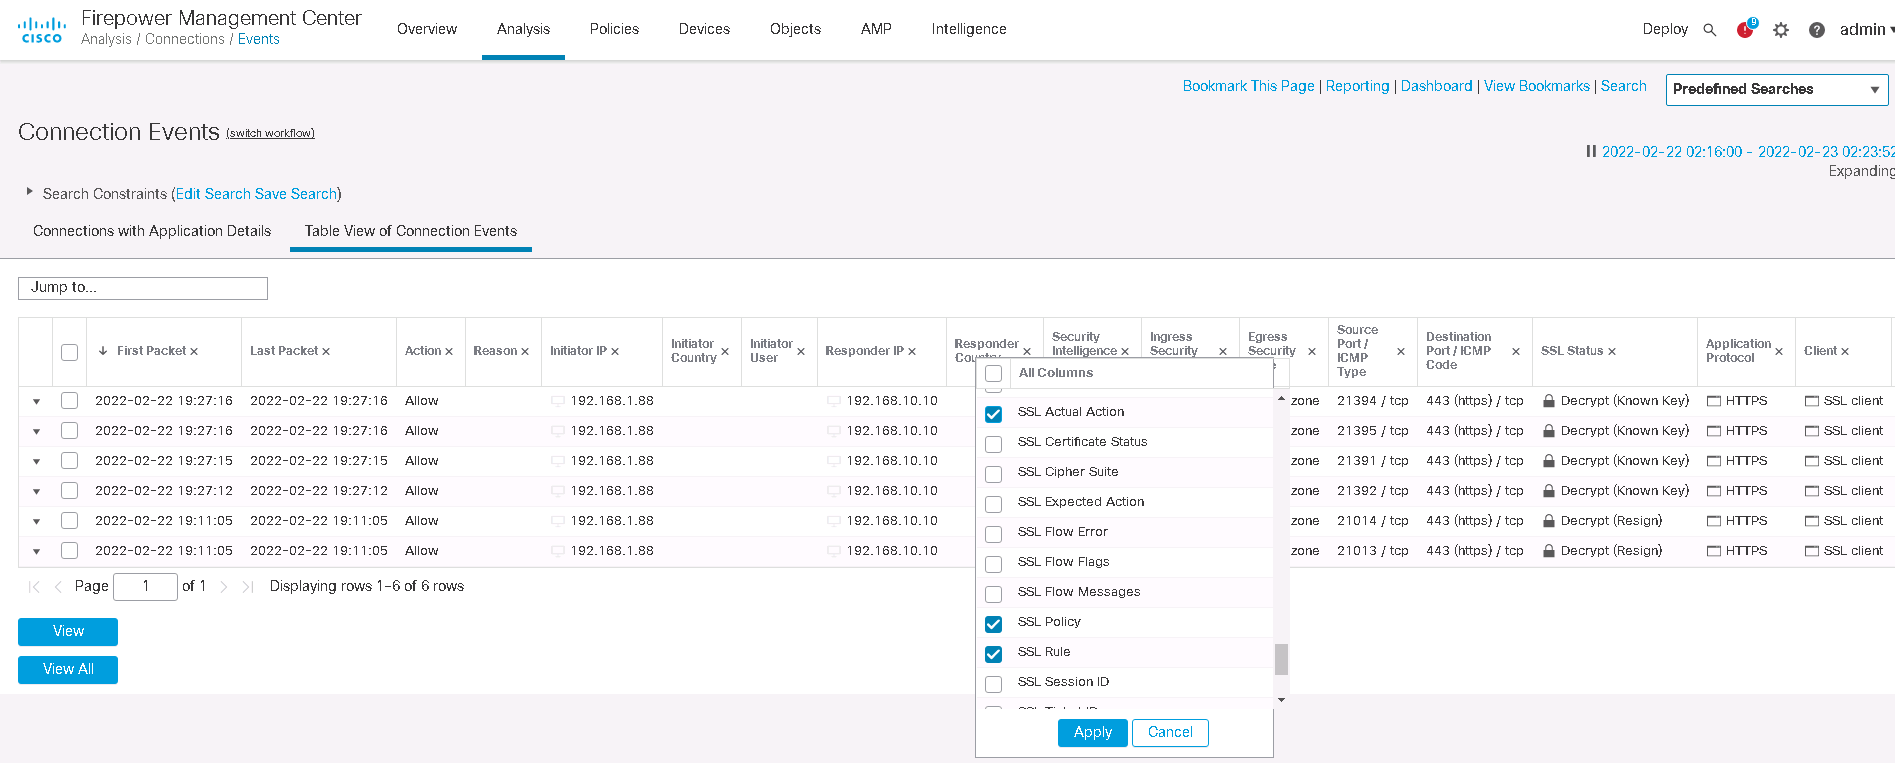
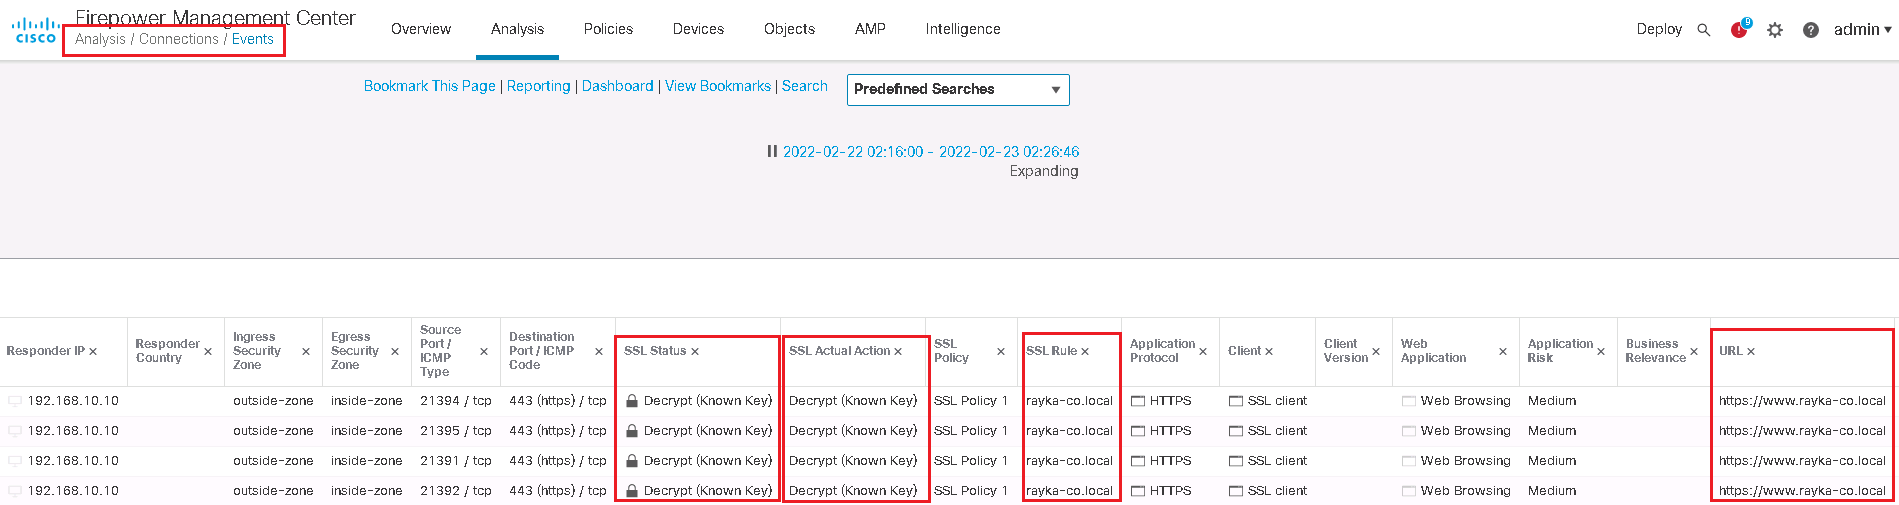
Now we can check our HTTPS website from outside the network to evaluate our SSL Policy.
We expect that traffic will be decrypted and inspect by cisco firepower. It can be checked using connection event.
We edit search field just for the URL https://www.rayka-co.local. We add three new fields in table view of connection to have a better overview of the output.

Tech Enthusiast & Knowledge Sharer
I am a passionate technologist dedicated to demystifying the world of networking, cloud computing, and automation. Focusing on simplicity and practicality.
I believe in breaking down complex concepts into understandable and actionable insights.